
How to Do a G.O.L.D.E.N. Case
“What if I told you you could get out of debt, faster than Dave Ramsey, without sacrificing your lifestyle, while building a tax-free retirement?”
SUMMARY
Request the illustration and Excel file
Gather the debt information from your client
Upload the debt information and the Excel to the debt software
Show the GOLDEN PDF to your client and then submit the application
Helpful Documents

G.O.L.D.E.N. Flyer

G.O.L.D.E.N. Illustration Calculator
Step-by-Step
Once you’ve determined that the prospect is a good candidate for our debt-elimination program, you will want to help the prospect free up inefficiently used dollars.
To do that, use the G.O.L.D.E.N. Debt Illustration Calculator (available in the documents portal).
Here is a video tutorial:
And here is a written tutorial:
As with all of the spreadsheets on the portal, you will only ever want to enter data into the white cells:
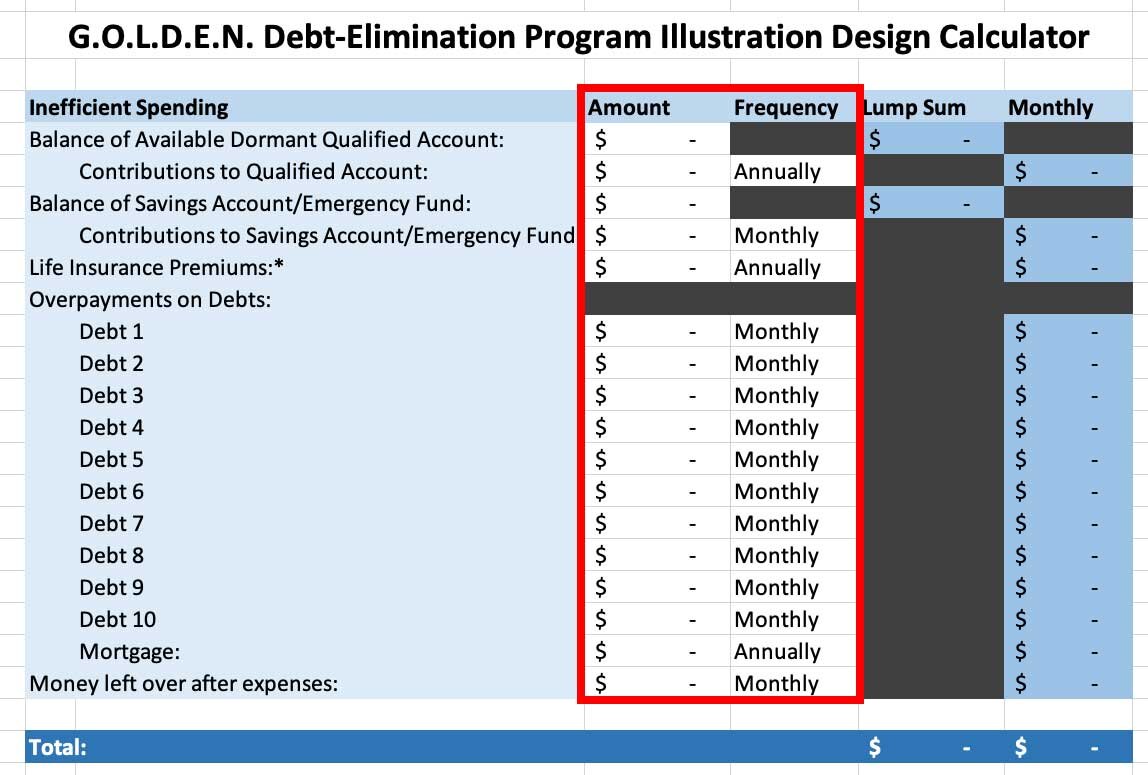
Work through this worksheet with the client.
Balance of Available Dormant Qualified Account
They will have to pay taxes on any amount they use from a qualified account, and possibly a penalty. Use the qualified comparison tool to determine if it makes sense.
Only insert the number into the spreadsheet if they are willing to redirect their qualified money.
But remember, our plan is a retirement account, too, but it’s better because it grows tax free and can be used to fund a tax-free retirement while investing in whatever they want. And it’s liquid.
Balance of Savings Account/Emergency Fund
Our plan is also a savings account/emergency fund. Twenty percent of the cash value is never used towards the debt repayment program. It is reserved for emergencies and savings.
So ours is a savings account/emergency fund, too, but better. Because it actually pays them in the meantime. And it’s just as liquid.
Life Insurance Premiums
If they have term insurance, it might be better for them to cancel it and redirect the term premiums into this plan. This is insurance, too, but it’s better because the death benefit doesn’t expire, and they get all the other benefits attached (tax-free retirement, cash value, living benefits, etc.)
Do not have them replace their term insurance unless this provides for their income-replacement needs as well or better than the term insurance. The FBIC is not designed for its death benefit, so don’t recommend replacing the term unless it is in their best interest to do so. And certainly don’t have them cancel their current policy before their second one is active.
Overpayments on Debts
Are they paying more than the minimum payments to pay down their debts faster? Are they making an extra mortgage payment once or twice a year? If so, let’s take that extra money (which right now is heading out the door and enriching their creditors) and redirect it into their plan here where it will work for them forever.
This is a debt-elimination program, but it’s better because it will get rid of their debt faster without them having to sacrifice their lifestyle or their retirement.
Money Left Over After Expenses
After they’ve paid all their bills and discretionary spending, how much do they have left over every month? Let’s use that money and stick it in this plan, too. They shouldn’t worry. If they need it for something, it will be there. It will just be working for them while they’re not using it.
Once you’ve filled out the form, making sure to select whether the figures are “monthly” or “annually,” your document should look something like this:

They won’t necessarily have numbers in every row, and that’s ok. But what we see here is that this person has $90,000 in a lump sum they can contribute, plus $1,366.67 per month. The spreadsheet will create a box below with instructions to be given to the case design illustrator:

Copy that text then head on over to the illustration request form and paste it in the notes section of the request.
The Debt Information
If you have your client on the phone and want to gather the debt information at the same time you submit it for the software, feel free to skip ahead to the software part. However, most clients don’t have their exact balances, interest rates, etc. readily available, so it might work better for you to send them the debt-sheet form (generate a client URL from the software) and have them fill it out.

Prepare the client before you have them fill out the form:
The more accurate the information they provide, the more accurate our debt predictions are going to be
For the mortgage information, have them include only principal and interest, not the other parts of their monthly payment going into the escrow account (like property tax prorations)
If they have debts that only temporarily have a low or no interest rate, have them put in the interest rate they will have to pay once it goes live (unless the minimum payment will have the debt repaid before the interest rate kicks in)
Make sure they put your name and email address in the form so you will get the debt information (it will be emailed to you the moment they submit the form).
The Software
Once you have the Excel file and the debt information from the client, you are ready to use the software. NOTE: UNTIL YOU GET THE ILLUSTRATION BACK AND HAVE THE XLSX FILE, YOU CANNOT CREATE A DEBT ILLUSTRATION.
The software is going to have a form where you’re going to input the debts and upload the Excel file. It will look like this:

The form itself is pretty self-explanatory, though you will notice that in some cases you may get a warning if the information the client entered is incorrect. For example, often the client will input not just principal and interest for the mortgage payment, but their entire monthly escrow payment:

You will occasionally also see a warning where someone is paying less than the accruing interest (meaning the debt will never be repaid):

When it comes time to upload the Excel file, you need to make sure it is in .xlsx (not .csv) format. If it came from Penn Mutual, chances are it is already in the correct format.
If you have a file in .csv format, you will want to convert it to an .xlsx file. To do that, open the file, then click “File” then “Save As” (or hit shift+command+S [shift+control+S on PC]):


In the pop-up window that opens, where it says “file format,” you’re going to click and select “Excel Workbook (.xlsx),” which should be the top option.

Navigate to wherever you want to save your file where you will remember it, then click save.

Now you’re ready to upload your file to the software.
For the Penn Mutual cases, just select the radio button that says “Penn Mutual”:

Then click on “Upload,” next to the paperclip:
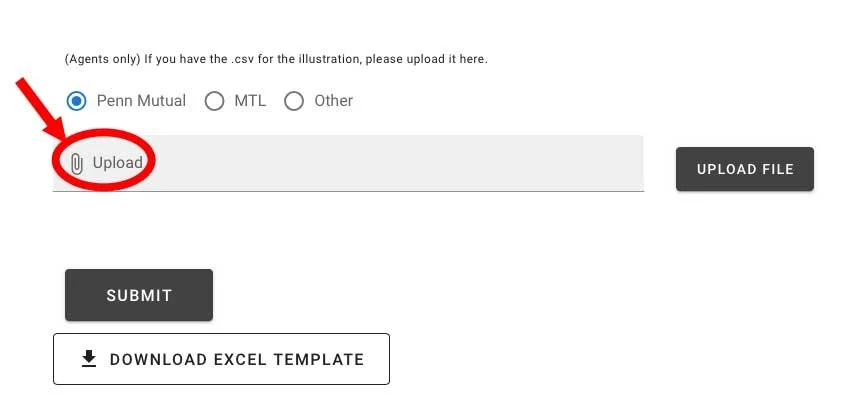
Navigate to the folder where you saved the Excel file and select it.
Now click on the “Upload File” button.

If you have mismatched the selection with the file you uploaded, the software will tell you. (E.g., if you uploaded a Penn illustration but selected “other.”)
After it uploads properly, the “upload file” button will disappear. Now you will click “submit”:

After you hit the submit button, the data will validate, and the button will now say “Generate PDF.” Click that button:


This will download the PDF. Save it, send it to the client, go over it with the client.
Here is a video tutorial of what the GOLDEN document means and how to do a walkthrough with a client:
When you’re ready to submit the app, use the instructions on the Application Submission page.
And use these percentages:
Agent: 85%; Zach, Z1Z-1402D: 15%